 |
|
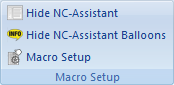
The Macro Setup menu. |
CIMCO Edit v7 includes built-in cycles and macros for common operations like program start, program stop and tool change. You can create custom cycles and macros for the operations most common to your own specific setups and applications.
|
|
The Macro Setup menu. |
Click this icon to show or hide the NC-Assistant.
Shows or hides the NC-Assistant Balloons.
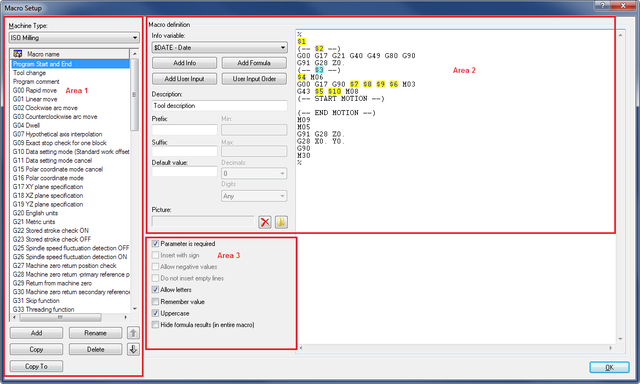
The dialogue Macro Setup is divided into three functional areas that are described in details in the following section.
 |
|
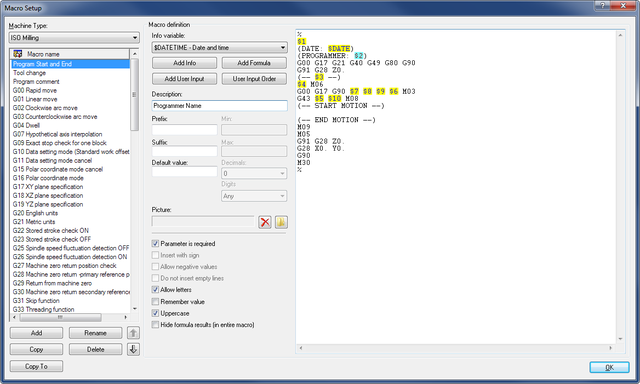
Macro Setup dialog |
This drop-down menu provides a list of defined machine types you can select from (e.g. ISO Milling, ISO Turning, Heidenhain, etc.).
Here you can see all available macros for the selected machine type.
Clicking on the Add button will open the dialog Add macro. Enter the name of the new macro and click OK. You will find this name at the bottom of the Macro name list.
Click this button to open the dialog Add macro. Enter the name of the new macro and click OK.
Click this button to rename the selected macro.
Click this button to make a copy of the selected macro. You can make a few changes in the name and the contents of the macro to create a similar macro and save it.
Clicking this button will display a warning message asking if you really want to delete the selected macro. If you answer Yes, the macro name and its contents will be deleted.
Click this button to copy the selected macro to a different configuration.
Use these buttons to move the selected macro up or down the list.
Use the field to the right to specify the contents of the macro.
A macro can contain both user and system variables. User variables are specified with a '$' character followed by a number, and system variables are specified with a '$' followed by the variable name.
In the field Macro definition, the macro block sequence is shown as it will appear in the NC program. NC code variables are replaced by parameters in ascending order. These parameters will be added to the macro program using the button Add (data input via the keyboard is not permitted and will not be accepted!). You can use the same variable multiple times in a macro.
To add a block number to a line, specify a '#' at the beginning of the line. If you need to insert a character right after a variable, you must insert a '|' (vertical bar) after the variable.
Example: To insert the user variable 2 followed by 100, specify $2|100'.
If this macro must start on a new line, make the first line of the macro definition blank.
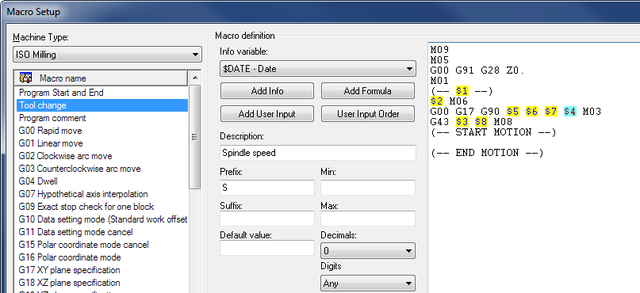
The macro Tool change consists of 9 NC program blocks with 8 parameters ($1 ... $8). The block number format (e.g. N0100) and interval (e.g. 10) can be configured and modified in the dialog Setup Block Numbers.
 |
|
Example of Macro definition with 8 parameters. |
Use this drop-down menu to add additional information to the macro (for example: Date, time, date and time, filename, etc.).
Click this button to insert a new information variable.
Click this button to insert a new formula.
Click this button to insert a new user variable.
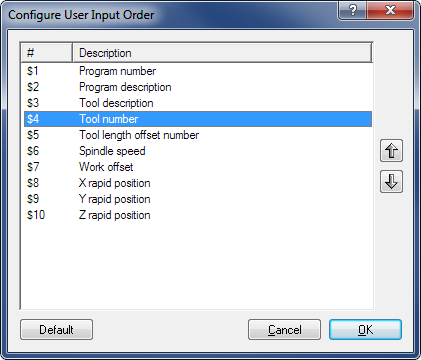
Click this button to arrange the order of user input variables when adding the macro. This does not change the order of the variables when the macro is inserted in the NC file.
When you click this button, the following window appears:
 |
|
The User input order dialog. |
Use the up/down arrows to change the order of the parameters.
Use this field to specify a description of the selected parameter.
|
When you insert the macro into the CNC program by clicking the icon |
 |
|
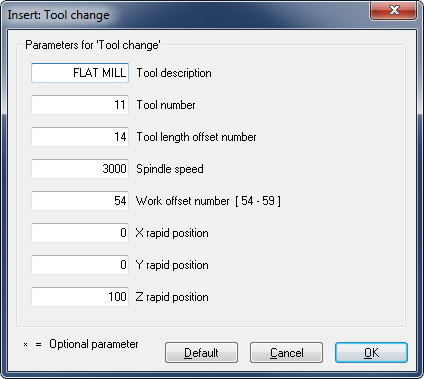
Macro parameter input fields (example). |
Use this field to specify a prefix string for the selected parameter, e.g. S for spindle speed.
Use this field to specify a suffix string for the selected parameter.
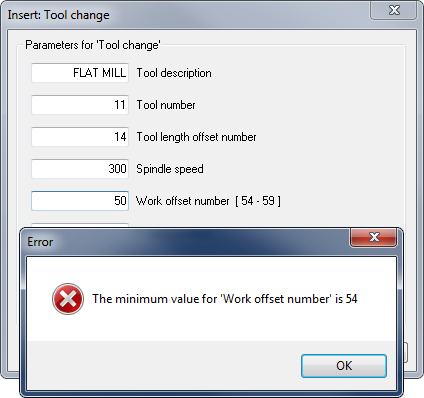
Use this field to specify a minimum value for the selected parameter. If you enter a value lower than the Min value, you will immediately be prompted for correction.
 |
|
Error message for value lower than Min. |
Use this field to specify a maximum value for the selected parameter. If you enter a value higher than the Max value, you will immediately be prompted for change.
Use this field to specify a default value for the selected parameter.
Use this field to specify the number of decimal digits.
Use this field to specify the number of digits. E.g. when inserting an O-number with 4 digits, the result becomes 'O0007'.
Use the check boxes to enable or disable additional options.
|
The additional options must be selected carefully, as they affect the final result. |
Check this field if the user is required to specify a value for the selected parameter.
If you do not check this box, the sign * will appear in the parameter input field, indicating that this parameter is optional. In this case, you do not need to enter a value in the field. If you do it anyway, you will change the (modal) value for this NC code.
Optional Parameters can for example be found at the 3 axes (X, Y, Z) of linear move (G01).
Check this field if the parameter value should be inserted with a sign.
Example: The value 123.4 will be inserted as +123.4.
Check this field to allow negative values for the current parameter.
If you leave this field unchecked, only positive values will be accepted!
|
If you (accidentally) enter a negative value into the macro fields, the (-) sign will be ignored. The entered value will be considered as the absolute value of the parameter and will output positive NC codes in the CNC program. |
Check this field if no blank line should be inserted when this parameter is not specified.
Check this field to allow the user to enter text string.
According to ISO Convention, texts in the CNC program must be written in parentheses so they can be read on CNC machines. To prevent forgetting the brackets, these are generated automatically in CIMCO Edit v7 when the field Allow letters is checked. Besides, the input fields Min, Max, Decimals, Digits and the box Allow negative values are grayed out.
The parameter $2 in the macro Program Start and End can include programmers' initials, text strings, and special characters in parentheses.
 |
|
Allow letters. |
Check this field if the last value entered for this parameter should be used the next time the macro is called.
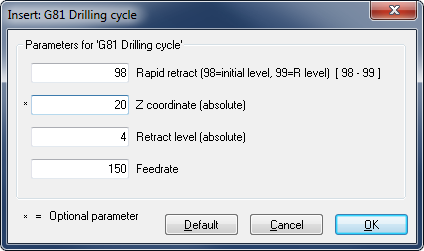
Example: Let's assume you need to drill a blind hole into a special steel with three depths Z10, Z16 and Z20 at a defined location (X,Y). To achieve this, use the macro 'G81 Drilling cycle' and check the box Remember value for the parameters $1, $3, and $4. This way, those parameters will be automatically filled out with the previous settings for the blind hole machining. As we want to drill at different depths, we do not select Remember value for the parameter $2, which is the modal Z value of the operation. Since Remember value is not activated, the field $2 will be marked with an * and is initially empty.
If the drilling program was previously run and you now call the macro 'G81 Drilling cycle' by clicking the icon ![]() , you just need to enter the first desired Z-value 10 into the field Z coordinate (absolute) and click on OK. Repeat the macro command with the Z-values 16 and 20, all other fields will be automatically filled out with the previously used values. Then you will have your blind hole.
, you just need to enter the first desired Z-value 10 into the field Z coordinate (absolute) and click on OK. Repeat the macro command with the Z-values 16 and 20, all other fields will be automatically filled out with the previously used values. Then you will have your blind hole.
 |
|
Remember value in macro G81. |
If the option Allow letters is enabled and you want to write with capital letters, check this field to make the user input uppercase.
|
You must check this box if you want to use both lower and uppercase in the text. |
When this field is checked, the results of NC-Assistant macro formulas are hidden.