 |
|
Figure 8.26: Example Lathe Part and Features |
The following turned part is used on the following pages to introduce lathe tool paths. This example deals with processes in general, so material and dimensions are not important now.
|
|
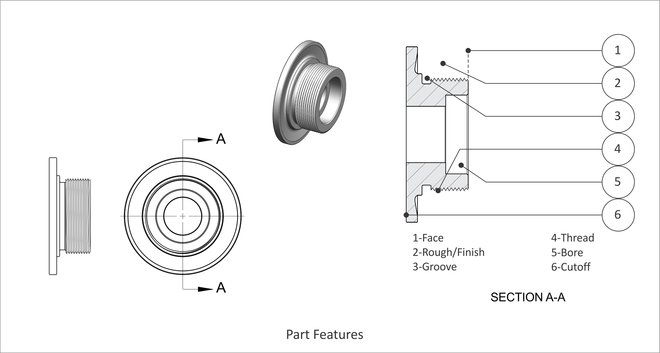
Figure 8.26: Example Lathe Part and Features |
Facing is usually the first lathe operation. It provides a known location to set the Z-offset of other tools and a flat surface for face drilling. Because sawed stock can vary in length, it is a common practice to take at least one roughing and finish facing pass.
The goal of lathe roughing is to remove excess material as efficiently as possible, ideally leaving a constant thickness of material for the finish tool. Finish tool paths determine the final size and surface finish.
Grooves have many configurations, but most have straight walls and radii at the bottom and top that is formed with the groove tool.
Threads on a lathe are usually machined with a special thread tool. Small diameter threads through the center of the part may be cut with a tap, just like on a mill.
Clearance holes in the bore may be drilled. Small bore holes may be reamed, but are usually finished with a boring bar tool.
The final operation is the cutoff. This may also put a chamfer or radius on the outside edge of the part. Once cut away from the stock, the part is allowed to simply fall into the bottom of the machine, though many lathes include a part catcher chute that extends during cutoff. The part falls onto this chute and rolls into cage for the operator to retrieve.
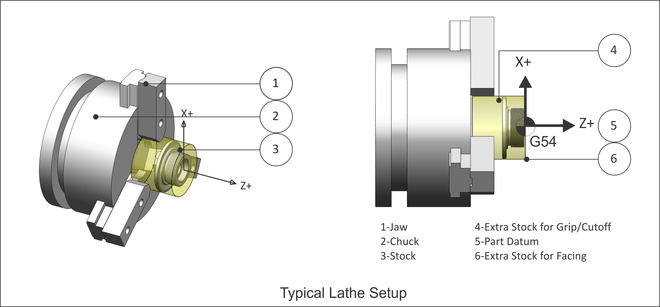
The part is gripped in hard jaws, soft jaws, or collet. Part datum is usually the center-face of the finished part. Provide enough excess stock to securely grip the part. The back side of the part should be as close to the jaws as possible while providing clearance for the cutoff tool.
 |
|
Figure 8.27: Typical Lathe Setup |
If using soft ways, machine them to fit the OD of the part. Jaws must have sufficient clamping pressure to hold the part. There is a limit to how far the jaws can be safely extended. This information is found in the chuck documentation.
The chuck secures the jaws. A hole in the chuck allows bar material to extend through the chuck. This is useful for production runs. After a part is cut away, the jaws are opened, the stock drawn out further, and then the jaws are closed. This saves cutting the stock to length and wasted material.
|
Warning: There is a limit to how far the stock can extend out of the chuck without supporting the other end. Check your machine and chuck documentation for this and other operating limits. |
Stock needs to be over-sized in Z and X so the face and finish tools remove material all around, including the cutoff.
Ensure the back side of the part is far enough away from the jaws to provide cutoff tool clearance. Lathes are extremely powerful and any collision between the tool and rotating jaws is dangerous.
The part datum for lathe parts is usually the center-face of the finished part.
Sawed stock is uneven and has a poor finish. Ensure the stock extends slightly beyond the finished face of the part so the face pass removes material.